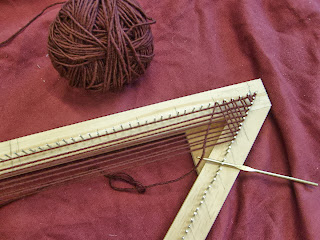
Here it is! - a side bar blog from Ewe And Us created for some of the 'informational' type posts I have been getting requests for. It just didn't seem right to include fiber art and other possible how-to blogs in with the farm news.
Of course, the 'regular' Ewe And Us blog readers are welcome to read and share these practical posts, but need not feel like they are missing out of the field notes by not signing up.
Several topics have been tossed around, but this first one is for the Facebook friends who have been asking and patiently waiting for the promised plans for my version of a home-made Triangle Loom.
Building a Triangle Loom
There has been a flurry of chatter all across the internet
lately about plans for building a triangle loom. I had seen them, and thought
the concept was interesting. If I could build my own it would not cost hundreds
or thousands of dollars, and would be at least a taste of understanding the
process. Hopefully enough to see if it was something I would want to invest
more money and the time to truly learn about the function and uses for a
loom.
I looked on line, and there was a number of plans as well as
finished looms I could purchase. I read a number, then combined the info with
my experience in construction and came up with my own.
The first expectation I crossed off the list was that the
loom itself be a work of art. No fancy woods or finishes, I only wanted
utilitarian. No fancy wooden pegs. Nails are good enough. Neither did it need
to be shipped, so size didn’t matter, but I did want it to be big enough that
the end result could be used as a shawl. So I made a 6 ft. first.
In my research, the info that seemed to be missing was exact
measurements. There was a good deal of talk about the hypotenuse side being the
‘size’ measurement, and somewhere I got that the nails on that side were ½ in
apart. The only other numbers I could find was the statement that the exact
same number of nails must be on each of the three sides. I admit this didn’t
make a lot of sense until I actually was using it, but now I understand. This
fact is the underlying basis of the construction of the loom.
So – how do you know what length the 3 sides need to be?
Well, it partly doesn’t matter. Crazy talk? Not really.
Here I re- called Geometry class. Triangle formula for a right triangle is a2 +
b2= c2 with C being the hypotenuse, or the long side. Forgotten that? Well, it doesn’t matter. At least not if you
don’t need it to be an exact size. I
used a more practical approach, which I have outlined here. Useful personal
experience hints appear like this.
1.
Get out a tape measure, and determine what
length you want the long side. Write it
down. Use the formula if it works for you. If not, -
2.
Go for a walk and find a right angle on the
ground. Parking lots and sidewalks or possibly a garage floor are
possibilities. (If you have a large square,
you can draw your own ) This will be the ‘point’ of the triangle. Use chalk,
string, or boards to lay down longer lines if necessary. Lay the tape
measure across the angle and move out until it reaches the measurement you
want. – the key is that both sides of the right angle must be the same. A second pair of hands is very helpful here,
especially if you want a size more than 4 ft or so. (
short cut – if you want one ABOUT 6 ft, the sides will work out to be approx. 4.5
ft. So you will need to buy a 10 ft. and a 6 ft. board)
A few basic skills are highly desirable, and a few necessary
for you to master before attempting to build your loom. Some will find the process highly
frustrating, so my best suggestion is to plan on working in small segments (i.e
while drilling holes) so you don’t burn out.
Tools and materials needed:
1.
Lumber for the frame – I bought plain ‘select’
grade pine 1 X 2’s . Carefully inspect, and get the straightest
ones you can find.
2.
Wood for corner braces. Plywood scraps are
handy, or you can use other scraps.
3.
Nails. Lots of nails. I choose finish nails, size 3D. Go ahead a
get the 1 lb. box. I found that one box, although the same size on the package, were
actually a bit smaller.
4.
Extra drill bits. Size 1/16 works well for the 3D nails. It is
very probably you will break at least one, possibly more.
5.
A few screws to fasten the corner brace boards. Size
needed will be determined by the thickness of the wood selected for the corner
braces.
Tools:
Tape measure, pencil, saw (chop
saw that does the angles is nice, but a hand saw will work), hammer, a T square
(artist or drywall) or other square, the longer the better.
Highly important – a good quality
power drill. (does not have to be powerful, just easy to use.)
Building The Loom
Cutting the brace boards -
 |
| Cut boards and braces |
See pictures for hints, but mine
in the picture are fancy in that some corners are squared (just because that
was the piece I had to work with – a square
piece of plywood will serve as braces for all 3 corners. Cut once, use the
right triangle for the bottom right angle. Divide the remaining triangle from
the point to the center of the longest side, and use on the 45 degree corners. As
long as it is secure at the corners, it doesn’t really matter. Looks matter
only to you.
Measure the boards for the short
sides, and secure the ends in a right angle.
Measure and mark the same distance
from the point of the right angle to where the long side will cross. Lay the
long board across, check to make sure the sides are equal, and mark across the
ends of the side boards. Cut boards to
length. These are the only angle cuts you will need to make.
Match up the outer corners, and
secure using the boards and a few screws. Always best if you drill pilot holes. (This
will be practice for drilling to come)
Turn the loom frame over. (yes,
you have been working on the back side. Think ahead on this in case it matters
to you if there is a mark or something on the ‘good’ side)
 |
| Finished front side of frame |
 |
| mark the mid point of long side |
 |
| Continue to mark along side rail |
Now get the square and align the
center mark on the head rail with the center of the point (right angle) and
mark. (This MUST be in line, as it will be your last time through the weaving,
and will be the bottom point of your finished piece.) Now continue to mark
points on the lower side rails, using the square as a guide, each according to
the square with the mark on the head rail. Yes, there are a lot of them.
However, this assures you will have the correct number of nails on the lower
rails, and you don’t have to be a math whiz to figure out the spacing.
-
Except, with all the marks made, you still only
have ½ the number as the head rail! Make
it simple – as you drill the pilot holes, on the side rails, put one in between
every mark.
Note here – this is the feature which limits the spacing of the nails
on the head rail. – Remember they will be twice as close on the bottom rails,
and they will only go so close together.
Now count the holes on all three sides again. And again, and
adjust if necessary. If they are not the same, it will still work, but you have
to adjust as you go, and it gets very confusing without a good deal of
experience. Yes, we are talking about approx.
144 per side for a 6 ft loom.
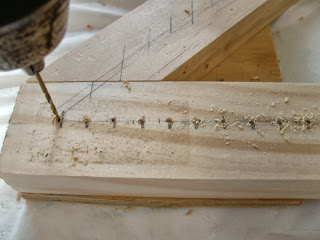
Now you are ready to drill the 432 pilot holes for the
nails. How deep? Only about ½ way
through the board. But if you try to skip this part, the board is likely to split while
pounding them in, and you have wasted your time and boards. Don’t feel bad if you break a bit. Or
two or three. They get soft when hot from drilling that much.
When holes are ready, you can tap in the nails. Straighten
the rows with gentle taps when done.
And its done. Start
gathering your yarn.
 |
| Finished |
I will not attempt to include instructions on how to begin
weaving. There are plenty of videos on Utube by people with a lot more
experience. That’s how I learned. My thanks
to ‘Plied and Dyed’. I watched her video about 15 times, then set up the loom
next to the computer and watched it one step at a time until I got it. Sort of.
Then about half done one my first try, it stuck, and it all made sense.
 |
| beginning to weave |
Here are a few things I learned that may have been helpful
if someone had just told me.
For a ½ in spaced top rail, a heavy worsted or bulky yarn
may work best. Avoid a single ply, at least at first.
Keep the loom at eye level. It’s very easy to miss a strand
while weaving back through. AND – if you make a mistake on one side, it
transfers to the other side. You will
also learn to un-weave because of this.
And finally, why the nails seem to be doubled on the side rails
– Look at a partially done weaving. Each top nail actually holds 2 vertical
strands, while the side ones each hold one. Yeah, it’s just that simple.
 |
| Ready for fringe |
 |
| Fresh off the loom |
I now have 3 – a 6 ft, a 2 ft, and an 8 ft., each with
variations in their construction design. They all work, and as expected each
has their own ‘best’ uses.
Please keep in mind this information is offered as
observational personal experience, and its only intention is to pass along to
interested fiber enthusiasts. Comments and criticism are welcome if of a constructive
nature.
I would be happy to answer questions by email eweandus@gmail.com

